Scott Townley
Bridgewater, NJ
Mounting a radio in a vehicle can be challenging. The challenge is multiplied when you add an amplifier to the mix...there are always lots of additional little boxes to deal with, not just one (and probably a larger) amplifier box.
Ideally the equipment would go in the passenger compartment, but I have to carry passengers too! In the end it made a lot more sense to put everything in the bed of the truck.
Mounting Method
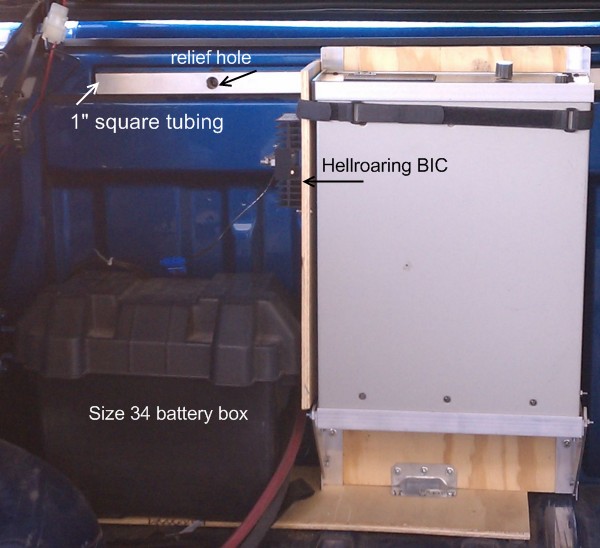
Everything is mounted vertically on sheets of plywood that are hung from the front wall of the pickup truck bed. The top rail of the bed has some factory 6 mm threaded inserts (for other accessories). Two 1" square aluminum tubes about 2-1/2' long each were fastened to those threaded inserts. 1/4" threadserts/rivnuts (threaded rivets) were then applied to the square tubing and used to fasten the plywood hangers.
Amplifier-Auxiliary Battery-Battery Isolator
Angle aluminum was used to build a frame to hold the amplifier to the hung plywood. The amplifier is mounted face-up, so that I can see the front panel meter and indicator lights during testing and troubleshooting. (Thermally it would probably be better to mount it face-down, so that convection aids the Hercules fan...but practically I knew I'd want to see the front panel). The frame was positioned so that there was as much room as possible underneath the amplifier to accommodate the length of the SB-120 power connector when connected.
IMPORTANT! I have a weathertight lid on my pickup truck bed. The amplifier is not exposed to the elements!
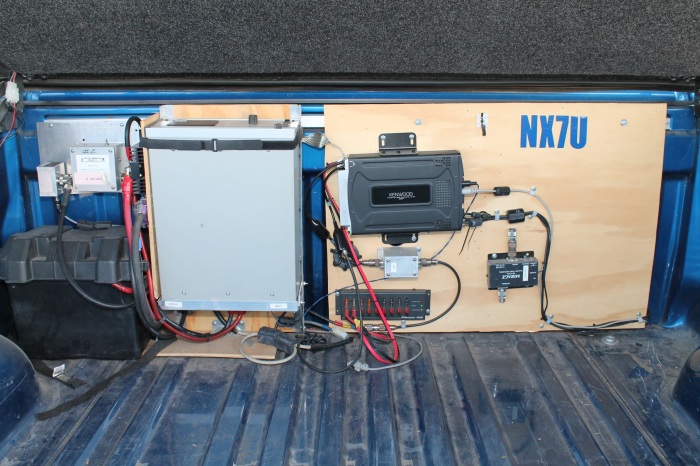
Here's everything all together. The radio and ancillary equipment are also mounted on a big piece of plywood, hung from the same square aluminum tubing. Lots of room for expansion. On the board is: the TS-480SAT, a 6m bandpass filter and preamp (not wired in here), and a Rigrunner DC distribution box. All the way to the upper left is an HF bandpass filter and the power/SWR meter sensor (Autek WM-1).
The heat of the Phoenix area (regularly in excess of 40 °C) does not seem to be a problem for the electronics. The truck bed lid is fiberglass and provides enough insulation and sunblock to keep the air temperature around 38 °C at most. The fact that the Hercules II amplifier has a fan probably helps a lot.
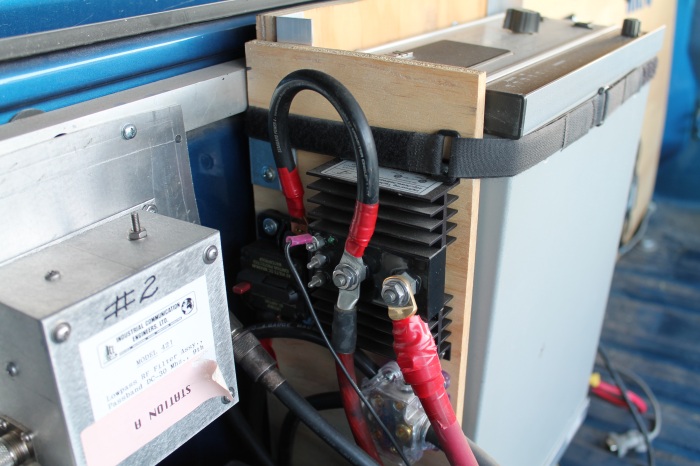
Closer view of the amplifier DC distribution. The alternator feed is the 1/0 wire furthest to the right. The auxiliary battery is wired thusly: (+) to circuit breaker to BIC to amplifier DC+.
The little wire hanging from the BIC is the ground reference.
Below the BIC is a (-) distribution block. The 1/0 feed from the alternator enters on the right. The two connecting #4 wires go to the auxiliary battery (-) and the amplifier DC-.
The alternator wiring exists solely to charge the auxiliary battery. The 1/0 wiring is WAY oversized. I think #6 or even #8 would have been sufficient.
Before the circuit breaker, I had used a MAXI fuse with an audiophile fuse holder. This proved to be remarkably unreliable under vibration (read: normal driving!).